Wednesday, April 6, 2011

Vietnamese Spring Rolls

This is one of the most popular Vietnamese dishes and also one of my favorite! It can be served as an appetizer but can sometimes be filling enough for a whole meal. There are many versions of the spring roll, but the Vietnamese Spring Rolls uses rice paper and is eaten fresh, not fried. There are a variety of ingredients that people put in their spring rolls depending on their preferences. Here is how I make my Vietnamese Spring Rolls with a simple hoisin/peanut dipping sauce.


DISCLAIMER: I normally do not measure the ingredients that I use. Everything is eyeballed and guesstimated but I will try my best to provide you with some type of measurements!


Ingredients:
  • Rice Paper Rolls
  • Shrimp
  • Pork Meat
  • Lettuce
  • Cilantro
  • Cucumbers
  •  Rice Vermicelli / Noodle
Ingredients for dipping sauce:
  • Peanut Butter (Crunchy or Creamy)
  • Hoisin Sauce
  • Water


Steps for the Spring Rolls:

1.) Boil the shrimp with the skin on. Once the shrimp is cooked, drain it and then peal the skin. You can use whole pieces of shrimp but I prefer to cut them in half.

2.) Boil the pork meat. You can use pork belly or regular pork meat (sorry, I don't know the proper name for the parts of the pig but I am sure any type of pork meat without the bone would work fine). Pork belly probably works the best, but sometimes the fat part is too thick for me. I normally cut off most of the fatty part. After the pork meat is fully cooked, cut it in thin slices.

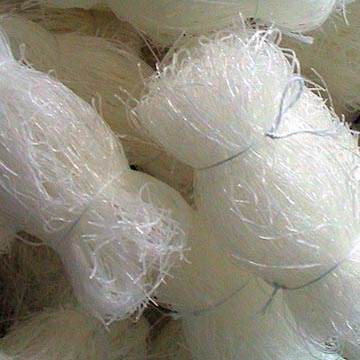
3.) Boil the rice vermicelli/noodle. Any time of rice noodle should work. Once they are cooked, drain all the water out and let the noodles dry. Here are some of the ones that I've tried:
 

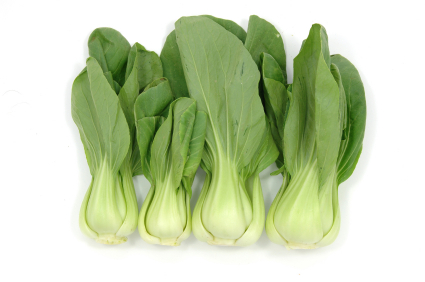
4.) Wash the lettuce (I like to use Romaine lettuce or the red leaf lettuce). Once it is dry, cut the lettuce into thin strips.


5.) Wash the cilantro. You can leave them whole, but I like to cut them into smaller pieces about 1/2 an inch long.


6.) Cut the cucumbers in thin, long slices. I like to use the Mediterranean cucumbers because they are very crunchy and does not have a lot of chewy seeds.


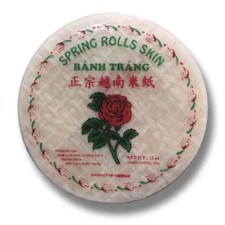
7.) Now you are ready to roll all those ingredients together in the rice paper!! There are many different brands of rice paper (called banh trang in Vietnamese). Sometimes it is also call "spring roll skin", "tapioca wrapper", or "spring roll wrapper". Before using these, they need to be quickly soaked in warm-hot water so that they soften up.


It would be a lot easier for me to show you how to roll the spring rolls than to try and explain it in writing. However, I was not able to upload a video in time but I found a great short video that you can watch.


Steps for the dipping sauce:

1.) Heat up a pan with Hoisin Sauce. This is the same sauce that I use for Pho (Vietnamese beef noodle soup)!! Use about half a bottle or more/less depending on how much spring rolls you make.


2.) Slowly add in about 1/4 a cup of water. The water helps loosen the thick Hoisin sauce. Stir frequently so that the Hoisin and water blends together. Add more water if the sauce it still too thick. Don't worry if you've add too much water because the sauce will slightly thicken once it cools down.

3.) Add about a spoon of peanut butter. You can use either the creamy or chunky peanut butter. Stir the peanut butter until it blends in with the Hoisin sauce.

4.) Let the sauce cool down before serving. Add some spice to it with Sriracha or any other chilli sauce.


As always, I hope you enjoy this recipe as much as I do and let me know how it goes!

Tuesday, April 5, 2011

Tuna Macaroni Salad

One of my favorite side dishes everrrrrrrrrrrr. I got this dish from my friend's sister a couple of years ago. This is very very simple and tastes great with turkey, chicken, ham and all of the above.


DISCLAIMER: I normally do not measure the ingredients that I use. Everything is eyeballed and guesstimated but I will try my best to provide you with some type of measurements!

Ingredients:
  • 1 Box of Pasta (I like to use either Elbow or Rotini)
  • 2-3 Sticks of Celery
  • 3 Cans of Tuna (use the ones that comes in chunks)
  • Light Mayo
  • Miracle Whip
  • Salt & Pepper
  • Lemon

Steps:

1.) Boil a pot of water and cook the pasta with a pinch of salt and about a teaspoon of oil. Follow the directions on the box.


2.) Drain the pasta and then put it in the fridge to cool.
  
3.) Cut the celery sticks into small pieces, about 1/4 of an inch thick. I usually cut off the top white part of the celery and only use the middle greener portion. I find that those pieces are crunchier and tastes better too. 


4.) Mix in 1/2 cup of light mayo and 2 cups of Miracle Whip with the chopped celery.


5.) Drain 2 cans of tuna and leave 1 can with the tuna juice. Mix the 3 cans of tuna with the mayo, Miracle Whip and celery.

6.) Add a pinch of salt and pepper and then squeeze in 1/4 fresh lemon juice to the mixture.

7.) Once everything is evenly mixed, add it to the cooled pasta and blend it all together. If the pasta looks too dry, you can add more mayo or Miracle Whip.


This is one of the easiest side dishes to make and it will surely be a crowd pleaser. I love this cold salad, especially during Thanksgiving. I hope you enjoy it. Let me know how yours turn out!


Thursday, March 31, 2011

Macaroni Noodle Soup

This dish may sound really really weird, but I promise you that it is deeeee-licious! My mom occassionally cooks this because its a very quick and simple dish. She did not make this dish from any recipe and I am not sure how it came about. But it was probably a result of a lucky experiment.

Anyways, my mom's "experiment" is the inspiration for my version of the Macaroni Noodle Soup. This dish is similar to the classic chicken noodle soup but with a big Asian kick to it.

This recipe is for 2-3 servings, but can easily be modified to make more servings.

DISCLAIMER: I normally do not measure the ingredients that I use. Everything is eyeballed and guesstimated but I will try my best to provide you with some type of measurements!
 
Ingredients:
  • Elbow Macaroni (or any type of macaroni)
  • 5 cups of Chicken Stock or Broth (you can use any stock/broth - beef, veggie, etc.)
  • 3 bunches of Baby Bok Choy
  • 3 Boneless Chicken Breasts
  • Garlic
  • Fishsauce
  • Black Pepper

Steps:

1.) Boil a pot of water to cook the macaroni. Once the water boils, pour in as much macaroni as you would like. Add a pinch of salt and about a teaspoon of oil. Then follow the cooking instructions on the box.


2.) Cut the ends off of the baby bok choy. You can leave the baby bok choy as is or cut off the individual leaves and then thoroughly wash it.
3.) Once the macaroni is cooked, put the macaroni in a strainer so that all the water can drain out.

4.) Clean the boneless chicken breasts and then cut it into small cubes.

5.) Mince the garlic.

6.) Heat up a pot with some oil; enough to thinly cover the bottom of the pot.

7.) Add in the minced garlic and let the garlic cook until it turns slightly brown. Then add in the chicken cubes. Mix the chicken cubes around until it is fully cooked.

8.) Once the chicken is cooked, add in the chicken stock or broth. Then add about 2 tbs. of fishsauce. If you don't have fishsauce, you can also use salt, about 1 tbs. Taste the soup and add additional fishsauce or salt if needed.

This is the fishsauce that I use, but you can use any type of fishsauce.


9.) Take the macaroni and put them in serving bowls. If the macaroni gets cold, you can quickly microwave it to make it warm.

10.) When the soup boils, add in the baby bok choy for about 1 minute. Then, remove the baby bok choy and place it in the same bowl as the macaroni.

11.) Finally, pour the soup in the macaroni and baby bok choy bowl and then add a pinch of black pepper.

This is a very simple dish that is quick to make and tastes very light. You can also make extra soup and macaroni to save for another meal. I hope you enjoy this dish as much as I do. Let me know how it turns out!!

Thursday, March 17, 2011

My version of Frittata…a.k.a. Baked Omelet

One of my co-workers occasionally brings in frittatas for everyone in the company (first come first serve basis). I have never heard of frittatas before this, but I really enjoyed it after trying it for the first time. The dish looked easy to prepare, but it took a few trial and errors before I was able to make something edible.

Frittata is an egg-based Italian dish that is very similar to an omelet or quiche. This is my version of the frittata, which I simple call a baked omelet.

This recipe is for 6-10 servings. You can easily modify the quantity depending on how much you want to serve.

DISCLAIMER: I normally do not measure the ingredients that I use. Everything is eyeballed and guesstimated but I will try my best to provide you with some type of measurements!

Ingredients:
  • 6 eggs
  • Shredded or grated parmesan cheese (or any other type of cheese that you like)
  • Black pepper
  • Salt
  • Cilantro (you can also use parsley)
  • Breakfast sausages (you can use any type of breakfast meat, such as bacon, ham, chicken, etc.)
  • 1 white or red potato

Optional
  • Mushroom
  • Spinach
  • Or anything else that you like to eat in an omelet

Steps:

1.) Preheat the oven to 275 degrees

2.) Peel and cut the potato in small bite size pieces and then boil

3.) Cook the sausages and then cut them into small bite size pieces

4.) Chop the cilantro

5.) Beat the eggs in a bowl and then mix in ½ teaspoon of black pepper and a pinch of salt

6.) Spread melted butter, oil, or Pam to a glass baking dish (I like using that, but you also use any non-stick baking pan)

7.) Add the potatoes and sausages to the glass baking dish and then pour the egg mixture on top

8.) Sprinkle on the chopped cilantro

9.) Put it in the oven for about 15 minutes, or until the middle inside is cooked

10.) Carefully take it out of the oven and then sprinkle on as much cheese as you like. Put it back in the oven for 1-2 minutes or until the cheese melts.

 
This is a great dish for breakfast but it can also be served during lunch or dinner. Just add in other ingredients such as chicken or broccoli to turn it into a different meal.

Enjoy!! And let me know what crazy ingredients you’ve added in your Baked Omelet!

Friday, March 11, 2011

Loaded Potato Skins

Last summer, I went to the 99 restaurant and ordered the "Outrageous Potato Skins" appetizer (highly recommend!!). It tasted so good and looked so simple that I wanted to replicate it at home. And so I did. I also made this during a Thanksgiving gathering last year, which turned out to be a big hit.

DISCLAIMER: I normally do not measure the ingredients that I use. Everything is eyeballed and guesstimated but I will try my best to provide you with some type of measurements!

All servings and quantities depend on how much you want to make.

Ingredients:
  • Small potatoes (red or white)
  • Krafts Three Cheese with Philadelphia Cream Cheese
  • Bacon (raw or pre-cooked)
  • Sour Cream
  • Ketchup

Steps:

1.) Boil a pot of water.

2.) Clean potatoes and add them to the pot once the water boils. Let the potatoes cook for about 10-15 minutes or until they are cooked.

3.) If you are using raw bacon, heat up a frying pan with oil and cook the bacon until they are crispy. Place the bacon on a plate layered with napkins so that it can absord some of the oil. Remember to let the bacon fully cool down.

4.) If you are using pre-cooked bacon, then follow the cooking directions on the box.

5.) Once the bacon is completely cooled down, turn them into bacon bits! You can cut them into small pieces or what I like to do is wrap them around the napkin and scrunch them up with my hands. This way, you can remove more excess oil.

6.) Pre-heat the oven to 350 degrees.

7.) When the potatoes are cooked, drain them from the pot and cut them in half. Then, take a spoon and scoop out some of the potatoes. Do not scoop out everything! Leave a bit of the potatoes attached to the skin (about 1/4 of an inch).

8.) Once all the potatoes have been scooped, you can start filling them in. Load the potato skins with the cheese. I like using the Krafts Three Cheese because it has a hint of Philadelphia Cream Cheese and just tastes good with this dish. I am not a cheese expert so you can use any type of cheese that you want, but make sure that its shredded.


9.) Now sprinkle the bacon bits on top of the cheese.

10.) Place the loaded potato skins on a baking sheet layered with aluminum foil. Put them in the oven for about 15 minutes. Once the cheese is melted, everything is done!


You can use ketchup and/or sour cream as a dipping sauce.


This is a great dish to bring to a potluck party. It is also a fun dish to do with kids. I made this one time with my 7-year-old nephew and his friend. They really enjoyed filling the potatoes!

Good luck and I hope you enjoy the potato skins!!

Thursday, March 10, 2011

Stir-Fry Clear Noodles

This recipe came about during my undergraduate college years (last year) while I was rooming with 4 other girls. One of my roommate decided to cook this dish one day for dinner, which she learned from her boyfriend's mother. The recipe has evolved overtime and was utterly abused during the last semester of college. Here is my version of this infamous "Clear Noodles" recipe.

This recipe is for 2-3 servings. You can easily modify the quantity depending on how much you want to serve.

DISCLAIMER: I normally do not measure the ingredients that I use. Everything is eyeballed and guesstimated but I will try my best to provide you with some type of measurements!

Ingredients:
  • Dry Vermicelli Noodles (4 pieces)
  • Hormel Spam or Ham Patties (about half a container)
  • String Breans (2 cups)
  • Garlic (3 gloves)
  • Olive Oil or any other cooking oil
  • Sesame Oil
  • Oyster Sauce
  • Soy Bean Seasoning Sauce
Optional:
  • Pickled Lotus Roots (about half a container)
  • Chili Sauce


Steps:

1.) Take the dry vermicelli noodles (sometimes called glass noodles, cellophane noodles, or bean thread noodles) and soak them in cold or room temperature water. If the noodles are tied, remember to cut off the strings before soaking. Let the noodles soak for 10-15 minutes or until they start to separate and soften up.


 2.) While the noodles soak, prepare all the other ingredients
  • Garlic - Mince into small pieces
  • String Beans - Rinse, cut off the end pieces and then cut them in half so that they are about 1.5-2 inches long
  • Spam - First cut the spam into thin slices, about 1/4 of an inch wide. Then cut them so that they are about 1.5-2 inches long. If you're using the ham patties, just cut them in half and then in small strips
  • OPTIONAL: Drain the lotus roots, rinse them, and then cut them horizontally in half.
Pickled lotus roots come in a clear container and can be found at any asian market. I love using it for this dish because of the crunch and texture that it adds.


I like using the Ham Patties a tad bit more, but Spam tastes just as good. 


3.) Drain the vermicelli noodles.

4.) Heat up a wok or big frying pan (preferably non-stick). Cover the wok with olive oil. After the oil is hot, add in the minced garlic.

5.) Add the Spam or Ham Patties to the wok and stir for about 30 seconds. Add the string beans and lotus roots. When the Spam turns slight brown, turn the heat down to medium.

6.) Add 2 tbs of the Sesame Oil and 1/2 cup of Oyster Sauce. Stir for 2-3 minutes, or until the string beans are cooked.

These are the brands of sauces that I use. You don't have to use the exact same ones, anything similar will work just as well.


7.) Add in the vermicelli noodles. Add 1 tbs of Sesame Oil and 2 tbs of Soy Sauce to the noodles.

8.) Evenly mix all the ingredients together. Add extra Soy Sauce to give the noodles some color.

9.) Once the noodles are soft and become a clear color, then it is ready to be served.

10.) Add a chili sauce for a spicy kick.


This is one of my top go-to dishes when I am cooking at home. I hope you enjoy it as much as I do. Feel free to leave any feedback or questions. Try out this recipe and let me know how your experience was!

Hello Blogging World, My Name is Trinh.

This is my first real blog post so please bare with me!

Welcome to Cooking Made Easy!

I am not a professional cook or anything close to it. I did not take any culinary classes (besides the mandatory classes back in middle school). But I have just found a new love for cooking and wanted to share my journey with everyone.

The biggest problem that I have with cooking is that numerous recipes are way too complicated and require a bunch of ingredients that I would probably only use for that one dish. When cooking at home, I like simple recipes where ingredients are transferable from one thing to another. Going out to eat is a different story though; the more the merrier!

Please feel free to give any feedback or recommendations on recipes that you've found to be delicious and simple!